Java SSL Keytool commands

Java Keytool is a key and certificate management utility that allows the users to cache the certificate and manage their own private or public key pairs and certificates. Java Keytool stores all the keys and certificates in a ‘Keystore’, which is, by default, implemented as a file. It contains private keys and certificates that are essential for establishing the reliability of the primary certificate and completing a chain of trust.

The ‘Java Keytool’ basically manages a keystore of cryptographic keys , X.509 certificate chain, trusted certificates. Users can use their public/private key-pairs and associated certificates for authentication/data integrity or digital signatures.

Every certificate in Java Keystore has a unique pseudonym/alias. For creating a ‘Java Keystore’, you need to first create the .jks file containing only the private key in the beginning. After that, you need to generate a Certificate Signing Request (CSR) and generate a certificate from it. After this, import the certificate to the Keystore including any root certificates.

Here are few important Java Keytool commands which can be executed on command prompt in windows

Generate Key Pair & Java Keystore

keytool -genkeypair -alias mydomain -keyalg RSA -keystore keystore.jks -keysize 2048

 Generate CSR for existing Java Keystore

keytool -certreq -alias mydomain -keystore keystore.jks -file mydomain.csr

Generate a keystore and self-signed certificate

keytool -genkeypair -keyalg RSA -alias selfsigned -keystore keystore.jks -storepass password -validity 360 -keysize 2048

Import a signed primary certificate to an existing Java keystore

keytool -importcert -trustcacerts -alias mydomain -file mydomain.crt -keystore keystore.jks

Import a root or intermediate CA certificate to an existing Java keystore

keytool -importcert -trustcacerts -alias root -file Thawte.crt -keystore keystore.jks

Check an individual certificate

keytool -printcert -v -file mydomain.crt

Check certificates in Java keystore

keytool -list -v -keystore keystore.jks

Check specific keystore entry using an alias

keytool -list -v -keystore keystore.jks -alias mydomain

Delete a certificate from Java Keystore keystore

keytool -delete -alias mydomain -keystore keystore.jks

Change the password in Java keystore / Change a Java keystore password

keytool -storepasswd -new new_storepass -keystore keystore.jks

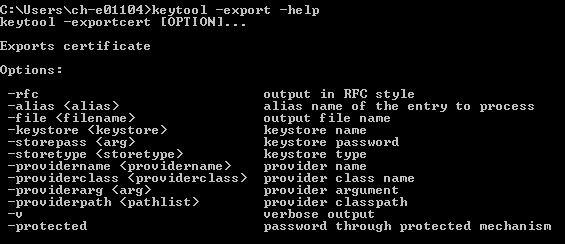
Export certificate from Java keystore

keytool -exportcert -alias mydomain -file mydomain.crt -keystore keystore.jks

List the trusted CA Certificate

keytool -list -v -keystore $JAVA_HOME/jre/lib/security/cacerts

Import new CA into Trusted Certs

keytool -importcert -trustcacerts -file /path/to/ca/ca.pem -alias CA_ALIAS -keystore $JAVA_HOME/jre/lib/security/cacerts
 Capture
Capture2
Note:
Both OpenSSL and Keytool have the same purpose: generating/storing keys and certificate(s). The thing is that Java can only work with certificates/keys contained within its keystore (JKS). Those certificates and keys are generated using the keytool library, not by using openssl.
Keytool will always need a keystore in order to store the certificates and keys it has generated, where this is not the case for openssl. Do note that OpenSSL can also be used to create a similar container, namely PKCS12 (.p12). This is a password protected container containing keys and certificates (just like Java’s keystore). However, it’s not compatible with Java. You’d need to convert the .p12 container to .jks before your Java application will be able to work on the certificates.

Oracle JDBC intermittent Connection Reset Issue (java.sql.SQLRecoverableException: Io exception: Connection reset )

I was recently struggling with the JDBC connection problem. There was a huge latency i.e. (3-4 minutes) while creating a database connection. Many times, the attempt turned into failure with Connection reset exception. After several hours, it connected one time and froze again.

I have checked several forums and found that this simply means that something in the backend ( at server) decided to stop working due to unavailability of resources etc. It has nothing to do with your code or the number of inserts. There occur some locks after calling SeedGenerator() and SecureRandom().

Reason: The JDBC 11g needs about 40 bytes of secure random numbers, gathered from /dev/random, to encrypt its connect string. /dev/random need very high-quality randomness such as one-time pad or key generation. When the entropy pool is empty, reads from /dev/random will block until additional environmental noise is gathered.

Now the question comes what is an entropy?

Entropy is a technical term for “Randomness”. Computers don’t really generate entropy but gather it by looking at stuff like the variations of hard drive rotation speeds (A physical phenomena that is very hard to predict due to friction etc.) When a computer wants to generate a pseudo random data it will need a mathematical formula with true entropy that it found by measuring mouse clicks, hard drive spin variations etc. Roughly speaking entropy_avail is the measure of bits currently available to be read from /dev/random

It takes time for the computer to read entropy from its environment unless it has cool hardware like a noisy diode or something.

You can check the “filling level” (maybe zero?) of your entropy pool and the overall size of the pool (usually 4096) by issuing

cat /proc/sys/kernel/random/entropy_avail
cat /proc/sys/kernel/random/poolsize

Unlike /dev/random, /dev/urandom device will return as many bytes as are requested. As a result, if there is not sufficient entropy in the entropy pool, the returned values are theoretically vulnerable to a cryptographic attack on the algorithms used by the driver.

Now let’s get back on our JDBC problem. Oracle JDBC 11g seems to use /dev/random by default. So, to overcome such issues of latency use urandom instead of random and do the following configuration in JDK

In the $JAVA_HOME/jre/lib/security/java.security configuration file, add the line

securerandom.source=file:/dev/./urandom

Note:

In the syntax, you need the crazy-looking filename, e.g., the extra,/./ to trick Java into accepting your filename. If you just use /dev/urandom, Java decides you didn’t really mean it and replaces what you wrote with /dev/random

Alternatively, to test a standalone application you can also set this execution parameter at run time instead of setting it in JDK.

 -Djava.securiy.egd=file:///dev/urandom


Revamped Functionality of Tools in LibreCAD

1) I had transformed the core functionality of “Draw Points to create a “Straight line.

In order to do this, Make following changes in this file librecad/src/action/rs_actiondrawpoint.cpp.

Please see below the source code for the same. Do all these modifications in trigger( )

int i;
for(i=1; i<=100; i++)
       {
         pt.x= pt.x +.5;
         pt.y= pt.y;

       RS_Point* point1 = new RS_Point(container, RS_PointData(pt));
       container->addEntity(point1);
       if (document) {
            document->startUndoCycle();
            document->addUndoable(point);
            document->endUndoCycle();
          }}

Screenshot from 2013-06-17 15:57:28

2) Then I modified the basic functionality of “Line with Two Points” to create a “Triangle“. Please see below the source code for the same:

data.endpoint.x= data.endpoint.x /2 ;
data.endpoint.y= data.endpoint.y /2 ;

RS_Line* line1= new RS_Line(container, data);
line->setLayerToActive();
line->setPenToActive();
container->addEntity(line1);

data.startpoint.x=data.endpoint.x *2;
data.startpoint.y= data.endpoint.y*2;

RS_Line* line2= new RS_Line(container, data);
line->setLayerToActive();
line->setPenToActive();
container->addEntity(line2);

Screenshot from 2013-06-17 16:22:36

3) Then I amended the functionality of “Circle with center and point” to create “Concentric Circles

Please see below the source code for the same:

int i;
for(i=1; i<=10; i++)
{    data.radius= data.radius-2;
    RS_Circle* circle1 = new RS_Circle(container,
                                     data);
    circle->setLayerToActive();
    circle->setPenToActive();
    container->addEntity(circle1);
}

Screenshot from 2013-06-17 16:23:33

Doxygen – Documentation Generator

Doxygen is a documentation generator, a tool for writing software reference documentation. It is the standard tool for generating documentation from annotated C++ sources, but it also supports other popular programming languages such as C, Objective-C, C#, PHP, Java, Python, IDL (Corba and Microsoft flavors), Fortran, VHDL, Tcl.

Installation : Run following command in terminal

$ sudo apt-get install doxygen

Usage : Type $ doxygen in terminal and you got its manual. So before start check its comment instructions.

To create documentation, move to folder where your source file exits through terminal and then type

$ cd /path_to_your_project/source/
$ doxygen -g [filename]

You can fill any filename as your choice. It is a configuration file and you can edit it according to your project details like change project name, location etc. Before creating a documentation from configuration file(filename), do following changes in configuration file i.e,

PROJECT NAME= ...........
OUTPUT DIRECTORY= ..............
INPUT= ./
RECURSIVE= YES

Then run

$ doxygen [filename]

With this your documentation will be generated. This will create 2 folders in your current directory.
Folders:

  • html for html documentation open /path/to/project/source/html/index.html to check documentation.
  • latex for documentation using latex as pdf output. For that file run
$ cd /path/to your project/source/latex
$ make

This will create refman.pdf file(check .pdf file as file name may be changed in your case).

Installation of LibreCAD from Source

   ImageLibreCAD is an Application for Computer Aided Design (CAD) in two dimension (2D). With LibreCAD you can create technical drawings such as plans for building, interiors, mechanical parts or schematics and diagrams.

 Fired up the terminal because you need to install the qt4 development libraries, tools, compiler and git.

Commands to run:

$ sudo apt-get install g++ gcc qmake git-core libqt4-dev qt4-qmake libqt4-help qt4-dev-tools libboost-all-dev libmuparser-dev libfreetype6-dev $ sudo apt-get build-dep librecad

DOWNLOAD:

The source code including the latest development of LibreCAD is available from the project page at github, https://github.com/LibreCAD/LibreCAD.You may simply fork the project from github, or clone the repository to your computer:

$ git clone https://github.com/LibreCAD/LibreCAD.git

COMPILATION:  Now you can run qmake (or qmake-qt4) to create a makefile and run make to compile LibreCAD

Commands to Run:

$cd LibreCAD
$qmake-qt4 librecad.pro
$make

Compiling LibreCAD might take a while, depending on the speed of your computer, but just let it run until it finishes. When it finishes, you will see the very last few lines showing something that translations where copied.

To finally run LibreCAD, execute the following command:

$cd unix
$./librecad


Common Errors during Compilation:

If error is muparser error:rs_math: muparser not found, then install muparser library by giving command in terminal.

$ sudo apt-get install libmuparser-dev

After installing libraries replace: #include <muParser.h> with #include “/usr/include/muParser/muParser.h” in the file librecad/src/lib/math/rs_math.cpp